

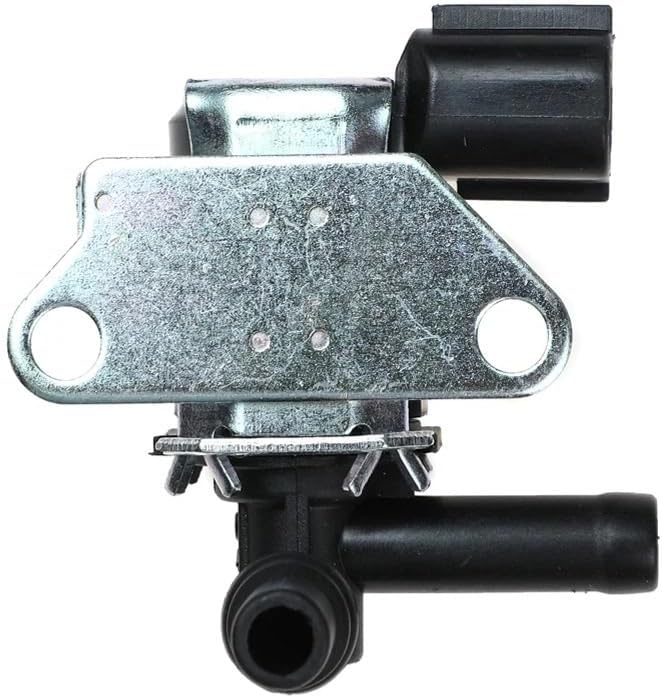
1PCS K5T48279 EVAP Canister Purge Valve Solenoid - EPDM Sealed Emissions Control for 1.3L-2.3L Engines 2000-2010 SAE J1455 Certified Fits Select Mazda Models and Rotary Engines
$37.99
Price when purchased online
Free shipping
Free 30-day returns
Sold and shipped by dev.maospa.vn
We aim to show you accurate product information. Manufacturers, suppliers and others provide what you see here.
$37.99
Price when purchased online
Free shipping
Free 30-day returns
Sold and shipped by dev.maospa.vn
Free 30-day returns Details
Product details
| Management number | 219387084 | Release Date | 2026/05/03 | List Price | $15.20 | Model Number | 219387084 | ||
|---|---|---|---|---|---|---|---|---|---|
| Category | |||||||||
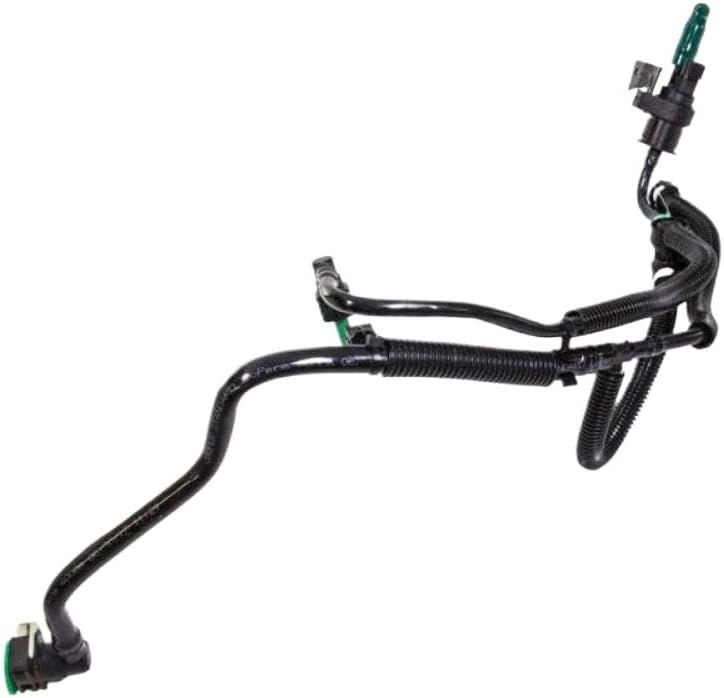
- Part Number Fitment: Z504-18-741A ,911-706, K5T48279, 2502-488017, Z50418741A, 911706, 2502488017
- Compatible with Mazda:6 L4 2.3L MFI,V6 3.0L MFI 2003-2004, 626 L4 2.0L MFI,V6 2.5L MFI 1998-2001, Miata L4 1.8L MFI 1999-2000, MPV V6-183ci 3.0L MFI 2002-2006, MPV V6 2.5L MFI 2000-2001, MPV V6 3.0L MFI 1996-1998
- Compatible with Mazda:Protege L4 1.6L MFI 1999-2003, Protege L4 1.8L MFI 1996-2000, Protege L4 1.5L MFI 1996-1998, Protege5 L4 2.0L MFI 2002-2003, RX-8 R2 1.3L MFI 2004-2008
- Guarantee: One year quality warranty, please contact us first for a quicker and easier resolution if you encounter any problems with the product during the warranty period.
- Product: Features stable performance; durable and long-lasting; tested before shipment; box packaging type; made of quality material; meets OEM standards and specifications; utilizes high-grade technology; easy to install and does not require special tools.
- Advantage:Improve performance;eliminates failure light codes;designed to be direct replacements and does not require calibration or programming or modification.
- Installation Steps: 1. Diagnose the trouble codes to identify the faulty sensor position and remove it from old socket; 2. Disconnect the wiring connector; 3. Plug in the new sensor; 4. Clear the trouble codes.


Bestseller ranking
Canister Purge Controls


Customers who viewed this product also viewed
Risers


Correction of product information
If you notice any omissions or errors in the product information on this page, please use the correction request form below.
Correction Request Form